Tiger Reading 101
Part One: How to Read Drum Music
A big pet peeve among drummers (beginners and pros alike) has to do with reading music. Most drummers seem to hate it. Why? Probably because they're not very good at it. And they're not good at it because they've never received a solid foundation in the art.
Reading music is not difficult and once you learn the proper techniques, along with a few tricks of the trade, you'll find that reading can be fun. Because reading presents such a problem for so many drummers, I devote this week's column to the topic. I'll start you off by giving you a solid foundation in reading, not just by showing you a few notes and having you memorize them. You'll learn how to break it all down into the simple math that music is (believe me, if it was difficult math, I certainly wouldn't be able to do it). Once you understand music at this level, you'll be able to read anything anyone throws at you.
Although this first lesson is designed for beginners, I encourage you guys who can already read "fly sh_t" (as they say in the business) to look it over too. Especially if you have students of your own, you might like to borrow some of the techniques.
The Basics
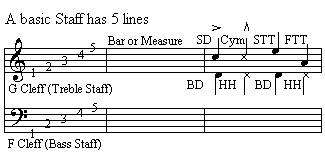
When learning to read music, the first thing you need to do is become familiar with the basic music staff.

As you can see in the above, the staff is made up of five horizontal lines. Vertical lines break the staff into separate bars, also called measures. Clef signs designate the pitch of each line on the staff. They are not needed for drum set music, but are used for tympani, vibes, marimba, and other pitched percussion instruments. The treble clef, also called the "G" clef, designates that the 2nd line on the staff is the note G. The bass or "F" clef indicates that the 4th line on the staff is the note F. These are not the only clefs in music, but they are the ones percussionists need to know. If you look at the 3rd bar in the figure above, you'll see the normal staff line designations for the various parts of the drum set. These sometimes vary though, depending on who writes the drum chart. (The key is as follows: SD = Snare Drum, BD = Bass Drum, Cym = Cymbal, HH = Hi-hat, STT = Small Tom Tom, and FTT = Floor Tom Tom.) Finally, the sideways V over the SD note and the upside down V over the Cym note both stand for accents. An accent means to play that note louder than the others. The upside down V accent is to be played louder than the sideways V accent.
Now that we've got the basics taken care of, let's move on to the actual language of music.
Notes and Rests
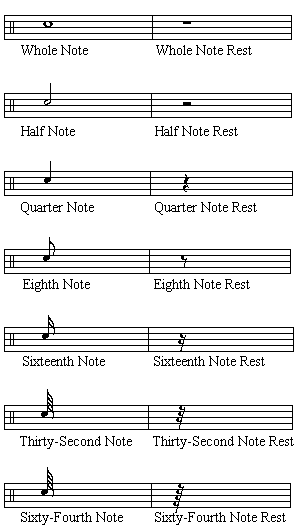
Much simpler than our alphabet, there are just seven notes and rests in the music system:

A note tells you to play and a rest means, you guessed it, don't play. At this point, you should look over the chart of notes and rests and memorize them. The ones that confuse most drummers are the whole and half note rests. Mainly because they look the same except for the way they either hang from or sit on the staff line. To avoid the mix up, I relate the word "whole" (which has five letters) to the word "hangs," which also has five. This helps me to remember that the whole note rest hangs from the staff line. In the same way, I relate the word "half" (with four letters) to "sits," which also has four. This makes it easy to remember that the half note rest sits on the staff line.
Time Signature
Critical to good reading chops is a thorough understanding of the time signature. In the beginning of every
piece of music (following the clef sign) you'll find two numbers written one above the other. This is the time
signature. There are four rules that will help you understand and calculate any time signature on the planet.
The rules are simple:
1) The TOP number shows how many beats are in a measure.
2) The BOTTOM number shows what note gets ONE beat.
3) Going UP each note gets TWICE as much.
4) Going DOWN each note gets HALF as much.
If you're a bit confused, have no fear. Once I give you an example, it'll all become clear.
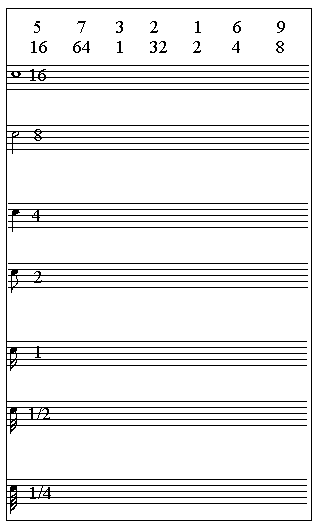
In the table below, you'll find seven time signatures written across the top. Using the four rules for time
signatures, I'll explain how I completed the first column and then you should be able to fill out the rest.
The time signature 5 over 16, means that there are five beats in each measure and the sixteenth note gets one
beat. I simply searched the table to find the sixteenth note and, once I found it, wrote a "1" next
to it. Next, I used the rules for going "up" and going "down." In this case, if the
sixteenth note gets one beat, then the eighth note would get two beats. If the eighth note gets two beats, the
quarter note would get four, and so on.
Once I completed the entire column going "up," I went back down the column to the starting sixteenth note. If the sixteenth note gets one beat then, according to the rule for going "down," the thirty second note gets 1/2 beat. If the thirty second note gets 1/2 a beat, the sixty fourth note gets 1/4 of a beat. Got it? See how easy it is? Okay, it's your turn.
Here's what I'd like you to do before next week's lesson:
1) Memorize the seven notes and their equivalent rests.
2) Memorize the above four rules for a time signature.
3) Fill-in the remainder of the time signature table (below).

Reading really is simple, once you learn the basics. I gotta go now, but I'll catch you back here next week for "Tiger" Reading 102. You'll get a chance to validate the answers to your time signature table, plus you'll learn about repeat signs, grace notes, and more. (And if you're wondering what the heck "Tiger" Reading means, check out my bio.)
Until next time: Stay loose.
Click the following link for Tiger Reading 102!
